Granola Bars
OK, I know, I’m back to sweets. I wasn’t given the nickname ‘Dessert Queen’ for nothing. But these are HEALTHY, so I feel justified.
These are the granola bars that my daughter mentions in our joint Pear Muffins post. I started making them when my daughter was in High School. The granola bars that you could buy were just not cutting it for her and I thought, why not try and make them? I tried a few different recipes until I discovered this one. There is no leavening in this granola bar which I think truly makes it a granola bar and not just a cookie granola bar. They are chewy and crisp at the same time. Store very well in the freezer. And make a great to go breakfast (which my daughter and son-in-law use them for) or a mid afternoon snack pick me up (which my husband likes them for) or a super quick lunch paired with a yogurt (which I sometimes eat). My son has not entirely joined the bandwagon: he likes them fresh, right out of the oven. Oh well.
If you have 2, 9 x 13 inch pans (like I do: yikes!) you can make another batch while the first one is in the oven and be set for quite awhile. I do this because if my husband sees me making them (and we have none) and I tell him they are for Sarah and Ian, he gets grumpy. So, I make a double batch…..
Granola Bars (adapted from Allrecipes, Granola Bars III)
2 cups quick cooking oats
1 cup all purpose flour
3/4 cup packed dark brown sugar
3/4 cup raisins
1/2 cup wheat germ
1/2 teaspoon salt
1/2 teaspoon ground cinnamon
1/2 cup chopped pecans
1/2 cup canola oil
1/2 cup honey
1 egg
2 teaspoons pure vanilla
Preheat oven to 350 degrees and and spray a 9 x 13 inch baking pan with canola oil spray.
In a large bowl, combine the oats, flour, brown sugar, raisins wheat germ, salt, cinnamon and pecans. Stir together with a rubber spatula and then with your hands break up any dark brown sugar clumps and break up any pecans that are too large, by twisting them in the opposite direction until they crumble. This is an important step and it’s where the ‘love’ comes in (you know how everyone says that your food tastes better when you prepare it with love). Stir together everything with your hands, somewhat sifting it between your fingers.
In a smaller bowl thoroughly combine the canola oil, honey, egg and vanilla with a whisk.
Pour liquid into dry ingredients and stir with a rubber spatula until combined. This is also an important step. It will seem that you have a woefully small amount of liquid but if you keep on stirring and pressing the ingredients together, it will combine. This may take a few minutes.
Put mixture into prepared pan, distributing it as evenly as possible. Then using the spatula move the mixture around in the pan until the bottom of the pan is covered evenly and then press mixture into pan. This is also very important: you want a bar that you can eat out of hand not a crumbly mess.
Bake for 25 minutes. Cool completely in pan. When cool, turn pan over onto a cutting board. Cut granola bars into about 1 inch x 4 inch pieces. Store individually in snack bags. Can be frozen or refrigerated, to keep longer.
Dry ingredients all mixed:

Pressed into pan:

Finished product:

Correspondence with my Daughter: Kale
Dear Mom,
One of my adventures in food that has stuck as one of my staple meals, is kale. I first got it at a farmers market a few years ago when we first moved to Boston. I think Ian had convinced me to get it (he definitely promotes my adventures with food because he will eat anything, see Miso Soup story, haha). I had no idea how to approach preparing the kale and was a little overwhelmed with the mere size of it. After some internet poking around I found a recipe though the The Wednesday Chef that had one of our favorite ingredients — ricotta.
I have made some revisions over the years to the recipe and also discovered frozen already cut kale at whole foods which helps reduce the task of cutting down that huge head of kale. It also significantly cuts the cooking time (bonus!) because you don’t have to cook down the kale as much.
One of the things that I haven’t figured out about Kale is the difference in varieties. Like last night I used “Blue Curled Kale” and have also used the “tuscan” variety. I have no idea what that means and how they differ. Something to explore…
Love,
Sarah
Ricotta & Kale Pasta
(adapted from The Wednesday Chef )
For two servings with some leftovers for lunch the next day, I use half a 16 oz. bag of frozen kale along with half a box of penne.
16 oz bag of frozen, chopped kale (if you can’t find frozen kale, strip the leaves off the stems and chop)
2 tablespoons olive oil
3 cloves garlic, minced
1 cup chicken stock
Pinch of salt and red pepper flakes
1/2 cup fresh ricotta
Penne (or whatever pasta you have)
Parmigiano-Reggiano for topping
1. Heat up your pan with some olive oil. Add the garlic and a sprinkle of salt and saute till soft. Add the kale and saute for 5 minutes (if using fresh kale, saute for 10 minutes until wilted).
2. Add the chicken stock, along with red pepper flakes and a little more salt to taste. Let it simmer covered for 10-15 minutes, or until most of the liquid is gone (this may take longer with fresh kale).
While it is simmering boil and cook your pasta.
3. Once the liquid is soaked up by the kale, turn off the heat and add your ricotta. I slowly add the ricotta and add more or less depending on how cheesy I want it. Taste and add salt or seasoning if needed.
4. Drain the pasta and add it to the the kale. Stir until everything is combined. Top with a good amount of Parmigiano.
5. Eat!

————————————
Dearest Sarah,
This recipe looks awesome and very simple!! I applaud you (and Ian) for trying different food stuff: I seem to be stuck in a rut, so this is inspiration plus!
But I can help you with the different Kale varieties. Dad just asked me to add Kale to one of our customer’s list of vegetables to grow for them. I use Cook’s Garden Catalog for most of our seed orders because they are always attuned to new varieties not only in the United States but all over the world. I also like Ellen Ogden (co-founder of Cook’s Garden with her husband Shepherd Ogden) because she not only overseas the catalog but also directs its test kitchen program. She is a gardener/cook and to me that is an invaluable combination in understanding varieties of vegetables.
According to Ellen, from her book From the Cook’s Garden “Tuscan kale, with slender leaves, is becoming more available outside of the kitchen garden – you will find it at many farmers’ markets, where it is sometimes cavolo nero or black kale. The Tuscan variety isn’t really black, just a darker green than the typical kale, and it has an earthier flavor. It cooks to melting tenderness in less time than its sturdier American cousin, so if you use the latter, cook it for a few minutes longer.”
There are 3 types of Kale that you might find either in the supermarket or farmer’s market. Cavolo nero (also known as black cabbage, Tuscan Cabbage, Tuscan Kale, Lacinato and dinosaur Kale) which as Ellen says cooks in less time than the sturdier American cousins, which include Winterbor a pale greenish blue version that is very curly and it’s counterpart Redbor which is a deep purple and also very curly.
So if you can find the Tuscan Kale, I would go with that variety for your dishes. I also found out that Kale is super nutritious, so kudos ! Maybe I can wean Dad off broccoli and we can start eating Kale instead!
Thanks so much for the recipe!
Love always,
Mom
Mid Week Inspiration: Chicken Tenders
I have not always been happy with recipes where chicken cutlets are called for. Usually the cutlets that are available to me are too thick, and in response I have pounded them thinner, cut the cutlets in half horizontally, substituted the ultra thin packaged cutlets. I was never really pleased with the results.
Then I started using chicken tenders. Granted they are slightly more expensive but I think definitely worth it. They cook quickly and they are ALWAYS tender. I use them in almost every recipe that calls for chicken cutlets and sometimes substitute them for recipes that call for chicken thighs.
The white ligament can be very tough if left in, so I take as much out as I can. A bit of a piece is ok. I usually move the tender around so that the ligament part is aligned with the cutting board and then just slice it off. You might get some of the tender too but it’s worth trying to take most of it out.
Cooking time might be reduced some, so be aware.
Below is a mini recipe for breaded chicken tenders, which can be used in chicken cutlet parmigiana, ‘as is’ with a side of rice pilaf and a vegetable (carrots, green beans, broccoli, etc) or a nice chicken cutlet sandwich on a roll with mozzarella, tomato, possibly avocado and italian salad dressing, for just a few suggestions.
You can increase or decrease the ingredients depending on how many tenders you will be doing, just keep the proportions the same.
Breaded Chicken Tenders
1/2 cup dried breadcrumbs (preferably homemade)
1/2 cup Panko
1/3 cup flour
2 eggs
Put on the counter 3 glass pie dishes or something similar. Fill the first one with the flour. Second one with the eggs and stir the eggs with a fork until mixed thoroughly. The third dish put the breadcrumbs and Panko. Heat your saute pan to medium and put in about 1 tablespoon of olive oil and 1 tablespoon of butter.
Dredge the chicken tender first in the flour, then egg and then the breadcrumb mixture. Make sure the oil/butter mixture is hot. When you put a tender in, it should sizzle. If not continue to heat the pan for a bit more. When pan is ready, place 4-6 tenders in the pan, do not overcrowd, and fry for about 5 minutes on each side until golden brown.
My station of flour, egg and breadcrumbs:

Frying in my saute pan:

All ready to be served:

Meatloaf
There are lot’s of recipes for meatloaf and I have tried plenty of them! But I always come back to our family recipe which is actually two recipes in one: Meatloaf and Swedish Meatballs.
I will be sharing just the Meatloaf this time around. I have not yet perfected the Swedish Meatballs but my sister has. I will be asking her to collaborate with me on them in the very near future. (um, Barb, would you mind?)
I prefer the mini size because it’s nice to get one little meatloaf (or 2) to yourself.
Meatloaf
1 egg
2/3 cup milk
1 teaspoon salt
1/8 teaspoon pepper (optional)
2 Tablespoons of finely chopped or grated onion
1/2 cup fine dry breadcrumbs (preferably homemade)
1 teaspoon Worcestershire Sauce (preferably Heintz Lea & Perrins)
1/2 teaspoon thyme
1 pound ground beef, 85%
Preheat oven to 350 degrees. Prepare a large rimmed sheet pan by covering with heavy-duty aluminum foil and spraying with canola oil (hey, I hate to clean up – this prep work is a time saver).
Combine first 8 ingredients in a large bowl. Stir together thoroughly with a large serving fork. Add the beef and combine with the other ingredients, using the large serving fork, until well mixed.
Divide the meat mixture into 6 little meatloafs and cover the top with ketchup. (Alternately, you can also make one big meatloaf.)
Put in the oven and bake for 30 minutes (the big guy will take about 1 hour).


Correspondence with my Daughter: Pear Muffins
Dear Mom,
I have been craving some different breakfast options recently, and in the absence of your granola bars (le sigh), I decided to make some muffins. I had some pears leftover from one of those Harry & David gift monster of a things and there were two that were perfectly ripe. After some internet-ing, I found a healthy-ish recipe: http://www.thekitchn.com/fall-breakfast-1-158809.
My one issue was that when I went to use my whole wheat flour…some insect had gotten into it as there was this weird web over it. Gross! I guess that shows how often I use it…oops. So I used only all-purpose flour. I think with the whole wheat they would be less cakey and more healthy-muffin-like. I read a bunch of the comments (thank goodness for internet recipes!) and the main complaint was that they were too dry, so I doubled the amount of milk and they came out perfect. My other change was that I didn’t have any ground ginger, so I used cloves instead, which was just as good.
I know with some revisions you could probably make it even better and possibly healthier!
Love Always,

Dearest Sarah,
I love the idea of using pears in muffins! (I will be sending granola bars, pronto!)
But before I delve into the recipe, I just want to help you solve your problem about whole wheat flour. I too have experienced this most annoying and disgusting situation and for a long time did not even buy whole wheat flour because of this. I now happily have whole wheat flour but I do not store it in my kitchen cupboard with the rest of the flour, sugar, salt, etc. I store it in the freezer. When I use it for recipes, I don’t even bother warming it up! Flour has such a fine texture that this is not necessary. Why the freezer instead of the refrigerator? No real reason at all except that I have more room in the freezer!! Refrigerator or freezer, it doesn’t matter. But it keeps the bugs out and your whole wheat flour ready to use.
As far as the recipe is concerned, here are some thoughts: most quick breads (which muffins fall into) use vegetable oil as their fat rather than butter. The standard procedure for mixing quick breads is, one bowl dry ingredients, one bowl wet ingredients, add wet to dry and stir gently until just combined. Usually cake ingredients are mixed in this fashion: butter, sugar, eggs, beat until light and fluffy, add wet and dry ingredients alternately until just combined. I think this is why your muffins are more cake-like. This is not a bad thing, I have a blueberry muffin recipe that is excellent and could definitely pass as mini cakes. But if a more dense texture is what you are looking for then I would substitute the butter with oil, and use the quick bread method for combining the ingredients.
I added a few additional ‘healthy’ ingredients: wheat germ and wheat or oat bran. These are usually in the organic section of your supermarket. I agree with you about the additional 1/2 cup of milk. Also, white whole wheat flour can be substituted for all of the flour in the recipe. This is a great alternative because whole wheat flour tends to be more dense and is very rarely used by itself, usually you need regular flour to lighten it up. White whole wheat flour combines the great attributes of both.
Below is the slightly altered recipe:
Pear Muffins
1/2 teaspoon ground ginger
2-2-1/2 cups of unpeeled, diced pears or whatever you get from 2 medium-sized pears
Topping: 1/4 cup of sugar combined with 1 tablespoon of cinnamon
Bake for about 20 minutes for smaller and maybe a little longer for the larger muffins. Let cool for about 1/2 hour in pans and then transfer to wire racks to cool completely.
I hope this helps. I will definitely be making these again because this is my first try at this recipe. If there are any changes I will let you know.

Mid Week Philosophy: Metal Spatula
This metal spatula that I have, made by Ekco, is old, really old. On the shaft it says ” Stainless Steel U.S.A., Ecko Forge”. The handle is wooden and it’s black now from too many washings. And the blade part has a crack where it is soldered to the shaft. We all use it in our household every day. It very rarely makes it back into the utility drawer.
My son saw the crack and told me. I have had this spatula since I lived in Albany, my mother had given it to me when I moved into my own apartment. I was 20 years old. It was old then. I don’t know how long she had it before giving it to me……. I never gave it a second thought when I was younger, I probably thought, great, a hand me down, why didn’t she buy me a new one?
It’s the best metal spatula I have. So I am sad because I have not been able to find a replacement. I thought I bought one last year but the metal part is too flimsy and works lousy at flipping eggs. I use mine more than a spatula, I use it to stir food, smash food, break up food: it can’t be flimsy. I’ve tried using a metal spoon as a substitute but it’s not the same. So, it has become invaluable to me.
I am sitting at the computer dismayed that some day it will break and I will be mad at myself that I didn’t take better care of it. I had a fleeting thought that I would get someone to make a replica, but who?
I know it’s silly. But my husband just went by as I was holding the spatula in my hands pondering and said, What are you doing? I told him and he said, That’s a great spatula!
White Clam Sauce
This is a recipe that I have no clue where it came from. All I know is that my Mom made it too, so I can only assume it was originally from her.
It is a very simple recipe, one that you can easily pull off on a busy night with little time and very few ingredients. I have the canned clams stocked in my cabinet, so they are always available ! It’s great to have a stand by dish.
I serve it with plenty of parmesan cheese, crusty french bread to sop up the butter sauce and a nice tossed salad.
White Clam Sauce
3, 6-1/2 ounce cans of chopped clams
1/4 cup olive oil
4 tablespoons of butter
2 small garlic cloves, minced
1 teaspoon oregano (optional)
1/2 cup minced parsley (optional)
Drain clams, reserve liquid.
In 2 quart saucepan over medium heat, add butter and olive oil. When mixture is hot add garlic (and oregano if using) and cook until garlic is lightly browned, stirring constantly (do not let the garlic burn).
Add clam juice and heat to boiling. Then reduce heat to low. Cover and simmer for 10 minutes.
Add clams and cook for a minute or so until clams (and parsley, if using) are heated through, stirring occasionally.
Serve over cooked pasta.
I also have added uncooked, peeled shrimp (8-10 shrimp or however many you want) when I add the clams. The shrimp is cooked when it turns entirely pink.
My son and husband like ‘red’ clam sauce, so usually I heat up my Tomato Sauce and serve it with the White Clam Sauce, so they can add whatever they want.
 Butter, olive oil and garlic simmering.
Clams that I use:

The original version:

Tomato sauce and shrimp version:

Correspondence with my Daughter: Miso
This is something new my daughter and I decided to do together and we hope you enjoy!!
Dear Mom,
I have a confession to make…the other night I made a disaster of a dinner! I wanted to surprise Ian with something yummy after his evening class and thought I would try something new. Miso soup is one of his favorites. He always judges a sushi restaurant based on their miso soup (and also how much they charge for it! He believes $1.75 is appropriate, haha.) At our last trip to Whole Foods, we found some miso so I decided to test it out. I tried to pump up the normal soup (which is essentially broth, and not a sufficient meal) with some dumplings and vegetables.
To my dismay, the soup came out tasting like a bowl of melted playdough….and I am most certainly blaming that Miso because after further inspection with a smell test, that miso smelled exactly like PLAYDOUGH. Bleck.
So I think my main problem was that it was “brown rice miso” whatever that means. It made the broth like dark brown (I’m going to spare you from the picture), and usually miso is white. Ian ended up actually eating it…I’m not sure how. I salvaged the dumplings for myself and added them to some chicken stock. Definitely not one of my shining moments…haha.
Love Always,
Sarah
——————
Dearest Sarah,
I am not familiar with Miso at all. You are definitely the more adventurous cook in our family!
But to answer your question about what happened to your soup, I found the best answer from a newsletter produced by The George Mateljan Foundation: Miso. These are two excerpts from it:
Description
Miso is a fermented soybean paste whose salty taste, buttery texture and unique nutritional profile make it a versatile condiment for a host of different recipes, including traditional miso soup. In addition to soybeans, some misos also feature rice, barley, or wheat.
Miso is made by adding a yeast mold (known as “koji”) to soybeans and other ingredients and allowing them to ferment. The fermentation time, ranging from weeks to years, depends upon the specific type of miso being produced. Once this process is complete, the fermented ingredients are ground into a paste similar in texture to nut butter.
The color, taste, texture, and degree of saltiness depend upon the exact ingredients used and the duration of the fermentation process. Miso ranges in color from white to brown. The lighter varieties are less salty and more mellow in flavor while the darker ones are saltier and have a more intense flavor. Some misos are pasteurized while others are not.
The different types of miso include:
- hatcho miso (made from soybeans)
- kome miso (made from white rice and soybeans)
- mugi miso (made from barley and soybeans)
- soba miso (made from buckwheat and soybeans)
- genmai miso (made from brown rice and soybeans)
- natto miso (made from ginger and soybeans)
While miso is the Japanese name we are most familiar with in the United States, this fermented soybean paste is also known as “chiang” in China, and “chao do” in Vietnam.
A Few Quick Serving Ideas:
Miso soup is quick and easy to prepare. Heat miso paste and water over low-medium heat. Eat as is or add in some traditional fixings including shiitake mushrooms, tofu, scallions, burdock, carrots, and daikon radish.
Miso-tahini sandwiches are one of our favorites. To make your own, just spread miso on a piece of bread and then top with tahini. Enjoy as is or add sliced avocado.
Use miso as an ingredient in marinades for meat, fish, poultry or game.
Carry dried miso soup packets with you and enjoy them as a pick-me-up coffee substitute.
Combine a little miso with olive oil, flax seed oil, ginger and garlic to make an Asian-inspired dressing that can be used on salads or cold grain dishes.
———————
So, it seems that you made your soup with genmai miso, one of the very dark misos. From the description above, I would give the hatcho miso a try for your next soup and see how it goes!
I will be doing the same with the little quick recipe above.
All my love,
Mom
MID WEEK PHILOSOPHY: COOKBOOKS
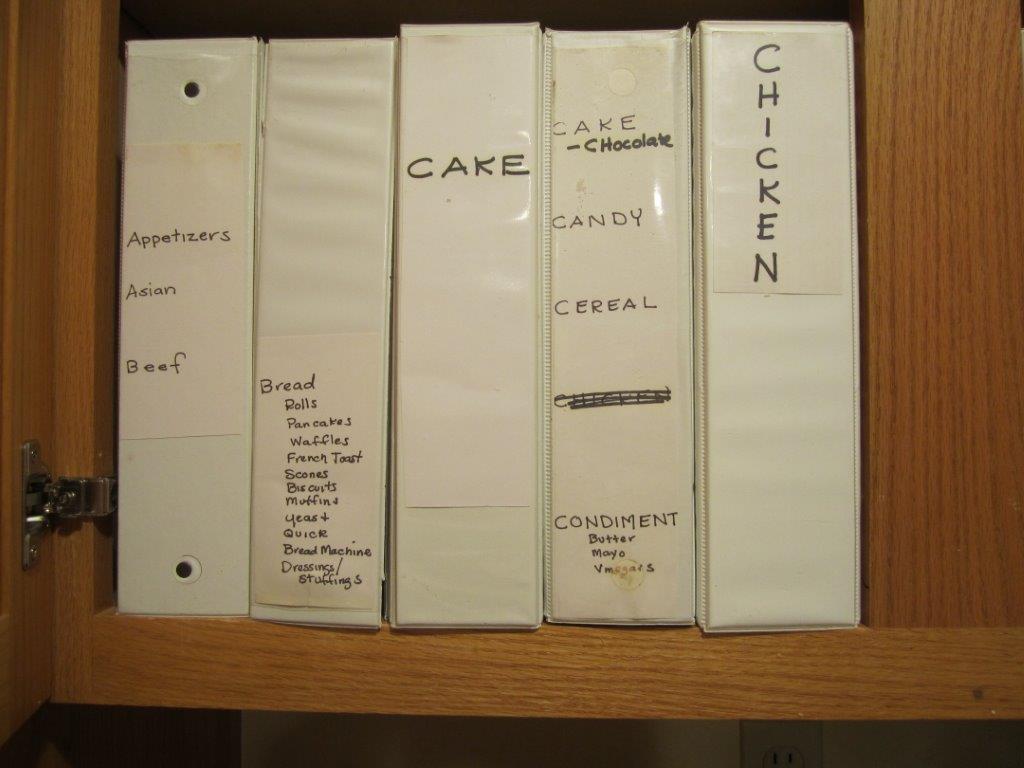
I have my fair share of cookbooks. Some are in the kitchen in a designated cupboard , some are in the guest bedroom ( I really still call it my daughter’s room, even though she no longer lives with us) on a bookshelf. Some cookbooks I have given to people whom I can’t remember and thus will never see those cookbooks again! But what I use the most are my own cookbooks. I use that term very loosely. They are really a collection of recipes from people. People that I love, like my mother, my aunt, my mother in law, who are no longer here. I cherish those the most. Some are written in their own hand writing, some are written by me while they were making the dish, some are ones I’ve taken over the phone. I also have recipes from my sisters, friends, co-workers, friends of friends, friends’ mothers and their friends: recipes that have been tossed around from one person to another and are sure-fire excellent. Some recipes I have collected from food magazines (some of which are no longer published). My new thing, is to get recipes from the web, either on blogs or recipe sites. These are a lot of fun because people usually comment on their results, which is almost like cooking it yourself but without all the work!!
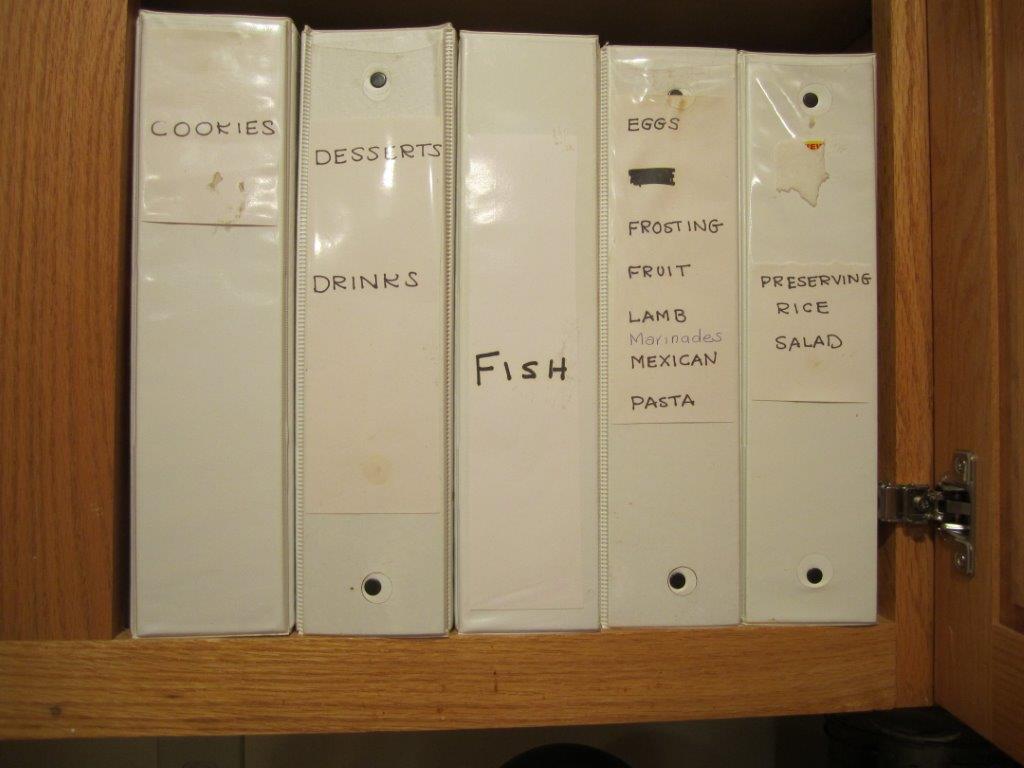
To get my ‘cookbooks’ together was extremely tedious. I did it one winter. One very long winter…..! I had outgrown my little file cabinets and was finding them annoying to use. I wanted books. So I got binders, sheet protectors and dividers and just started. I did it for a couple of hours almost every night, at the dining room table while others in the household were asleep or watching television or doing homework. I think the most difficult thing of the whole project was how to categorize. I used cookbooks to help me but even some recipes really had nowhere to go. Where do you put granola bars: are they a cookie (sort of)? are they cereal ? (well, they have a lot of cereal components in them.) I ended up putting them in the cookie section under the tab “Other”.
My mother always told me, ‘It’s great to be organized and file everything away. But sometimes you can’t remember where you decided to file it!” Boy, was that true. I ended up putting a Beef and Macaroni Recipe in two spots: one in Pasta and the other in Beef because I’d lost it temporarily one day!! And where do you put marshmallows? I know I have recipes for these but I can’t remember where! I will come upon them someday……
I also share new recipes with my daughter who lives in Boston with her husband. I will make something new, it will taste very good and I will e-mail my daughter the recipe. She does the same for me and we have collected quite a few very nice recipes this way.
I still read cookbooks. I get inspired when I am reading them but it doesn’t last and I end up putting it on the bookshelf and slightly forgetting about it. I am perplexed by this….. something to work on because I am sure there are some great recipes in those books!! I really enjoy cookbooks where the author talks a bit, either about how they came about making the recipe or what they were doing at the time. It makes it more personal, like reading a novel. Some of my favorites are: A Homemade Life: Stories and Recipes from My Kitchen Table by Molly Wizenberg, The Cake Bible by Rose Levy Beranbaum, The Barefood Contessa Cookbook by Ina Garten. Two technical cookbooks that I reach for on a regular bases: Betty Crocker’s Picture Cookbook (ring-bound) and Good Housekeeping Illustrated Cookbook (I no longer see mine available but one of the newer ones should be good, too.) And two books that I have put on the shelf and have now taken off and will be making some food from!!: Chocolate & Zucchini, Daily Adventures in a Parisian Kitchen by Clotilde Dusoulier and The Perfect Scoop by David Lebovitz.
Happy reading, from my kitchen to yours!
Meatballs
These meatballs are meant for tomato sauce. I have tried about 7 different recipes, trying to find the perfect meatball that was easy and had simple ingredients. Some had bacon, ground pork, ground veal, or ground turkey, all very good! But the ingredient that was shared in alot of the recipes, that I thought really made a difference, was the addition of parmesan cheese.
This recipe is very simple and can easily be doubled, so that you can freeze some for another time.
Meatballs (adapted from Food.com, Authentic Italian Meatballs)
1 egg
1/4 cup milk
1 cup fresh breadcrumbs
1/2 teaspoon salt
1 teaspoon oregano
2 large or 3 small garlic cloves, minced
1 cup packed, grated parmesan cheese
1 lb. of 85% ground beef
Preheat oven to 350 degrees.
Mix first 7 ingredients thoroughly, from egg to parmesan cheese in a large bowl, using a large serving fork.
(I do not mix meatballs or meatloaf with my hands like many recipes tell you. I feel that it really mushes the beef way too much and makes for a very dense ball or loaf when cooked. Mixing with a large serving fork ensures that the ball or loaf will be soft in texture, which is what I prefer.)
Then add the beef and mix again with the large serving fork until thoroughly combined.
(I also find that if you mix all the ingredients together, without separating out the beef, you are never quite sure you have incorporated everything and then you may mix too much!)
Take 1-1/2 ounces of meat mixture and form into a ball.
Place onto a greased cookie sheet, using canola cooking spray.
Bake for about 15-20 minutes, until golden brown.
Add meatballs to a saucepan containing about 3-4 cups of Tomato Sauce and simmer for another 20 minutes.
Serve over spaghetti (or penne or ziti or pasta of your choice) with additional sauce if desired.
**White bread, any kind, rolls, sliced bread, whatever you have on hand. Chopped pretty fine (with a Cuisinart or blender), and dried in the oven at 250 degrees, for about 1 hour. I put mine in the freezer for future use.
Happy Cooking from my kitchen to yours!!
Meatballs ready to go in the oven:

Meatballs right out of the oven:

Simmering in sauce:

Nice and tender inside:

Ready to Eat!! yum:

